Smartphones have transformed the way we take and share photos. With camera technology advancing rapidly, the latest devices offer high-resolution sensors, intelligent AI enhancements, and multiple lenses — all packed into your pocket. However, even the best smartphone cameras can benefit from proper technique, planning, and creativity.
Whether you’re aiming to capture breathtaking landscapes, better portraits, or clean product shots, here are practical tips for improving your smartphone photography, no matter what phone you use.
1. Clean Your Lens — Seriously
It might sound simple, but one of the easiest ways to improve your smartphone photos is to clean the lens. Our phones often sit in pockets, bags, or get handled with oily hands, leading to smudges that blur photos.
Tip: Use a microfiber cloth or lens wipe to gently clean your camera lens before shooting.
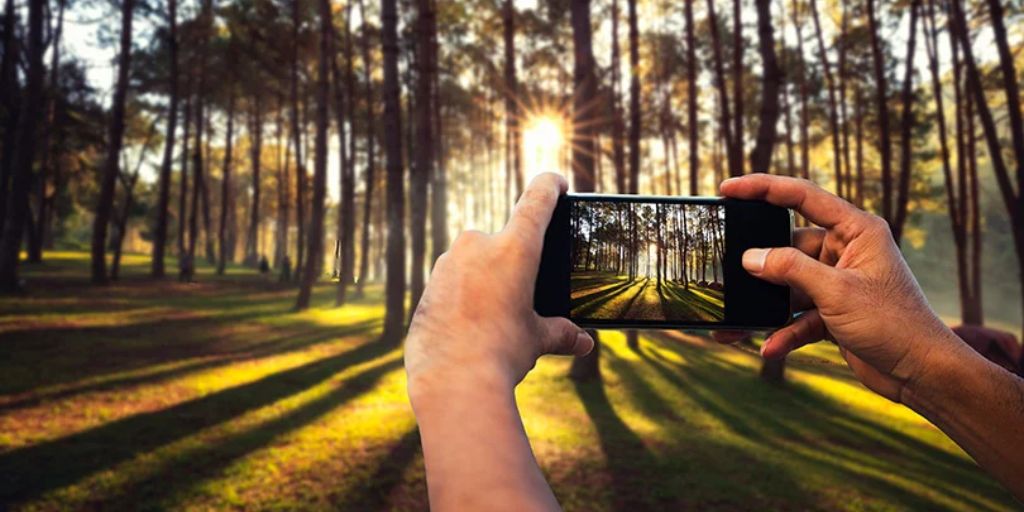
2. Tap to Focus
Smartphone cameras try to guess what the subject is, but they don’t always get it right. You can override this by simply tapping the screen on the subject you want to focus on.
Most phones will also adjust exposure based on where you tap, brightening or darkening the image accordingly. This gives you more control and helps ensure your main subject is sharp and well-lit.
3. Use Natural Light Whenever Possible
Lighting is one of the most important elements in photography. Smartphone sensors, although powerful, are still small and struggle in low light.
-
Shoot during golden hour (an hour after sunrise or before sunset) for warm, soft light.
-
Avoid harsh midday sun, which can cast unflattering shadows.
-
If indoors, position your subject near a window for diffused natural light.
Avoid using the built-in flash unless absolutely necessary, as it often creates harsh, uneven lighting.
4. Understand the Rule of Thirds
The rule of thirds is a fundamental principle in photography. It suggests dividing your image into a 3×3 grid and placing your subject along those lines or at the intersections.
Most smartphones have a grid overlay that you can enable in camera settings. Use it to:
-
Align horizons
-
Place subjects off-center for more dynamic compositions
-
Lead the viewer’s eye through the frame
5. Don’t Overuse Digital Zoom
Smartphones often offer digital zoom, but it’s essentially just cropping the image and reducing quality. Instead of zooming in digitally, physically move closer to your subject when possible.
Some phones have multiple lenses (e.g., telephoto), which allow for optical zoom. That’s a better alternative, but still use it thoughtfully — especially in low light, where zoomed-in images may suffer from noise.
6. Keep It Steady
Blurry photos are often caused by camera shake. To reduce this:
-
Hold your phone with both hands.
-
Tuck your elbows into your body for added stability.
-
Lean against a wall or surface if possible.
For even better results, use a small tripod or a phone stabilizer, especially for low-light shots or long exposures.
 Tips for Better Smartphone Photography
7. Use Portrait Mode… But Wisely
Portrait mode uses software to blur the background (bokeh effect), simulating a DSLR-style shallow depth of field. It works well for headshots and close-up subjects, but it can sometimes misinterpret edges, especially around hair or fine details.
Best practices for portrait mode:
-
Use it in good lighting.
-
Keep the background at a reasonable distance.
-
Tap to lock focus on the eyes.
Avoid overusing portrait mode in scenes where everything should be in focus (e.g., landscapes or group shots).
8. Explore Manual/Pro Mode
If your camera app includes manual or pro mode, take advantage of it. This mode gives you DSLR-style control over:
-
ISO: Controls light sensitivity. Lower ISO = less noise.
-
Shutter speed: Slower speed lets in more light but risks motion blur.
-
White balance: Adjusts the color tone.
-
Focus: Manually choose focus point for precise control.
Manual mode is perfect for night photography, long exposures (e.g., light trails), and artistic effects.
9. Use HDR When Needed
HDR (High Dynamic Range) helps balance highlights and shadows in scenes with tricky lighting — like shooting toward the sun or indoors near bright windows.
Most smartphones have auto-HDR enabled by default, but you can also toggle it manually. Use it when:
-
You’re photographing backlit subjects.
-
Scenes have extreme contrast.
-
You want detail in both sky and shadows.
Avoid HDR for fast-moving subjects, as it blends multiple exposures and can cause ghosting.
10. Take Advantage of Burst Mode
Capturing a moving subject? Burst mode takes multiple photos in rapid succession, letting you pick the best one.
Great for:
-
Sports
-
Children and pets
-
Action shots (e.g., jumping, dancing)
On many phones, burst mode is activated by holding down the shutter button.
11. Shoot in RAW (If Available)
Shooting in RAW preserves more detail and allows for greater flexibility during editing. While JPEGs are compressed and processed automatically, RAW files retain all the original image data.
You’ll need an app like Adobe Lightroom or your phone’s native Pro mode to shoot and edit RAW. This is especially helpful for:
-
Night photography
-
Editing exposure or white balance after the fact
-
Preserving detail in shadows and highlights
12. Edit Thoughtfully
Great photos aren’t just taken — they’re enhanced. Use mobile editing apps to adjust:
-
Brightness and contrast
-
Saturation and white balance
-
Sharpness and clarity

-
Cropping and straightening
Top mobile editing apps:
-
Adobe Lightroom Mobile
-
Snapseed (by Google)
-
VSCO
-
PicsArt
-
Afterlight
Avoid over-editing — too much saturation or sharpening can make photos look unnatural.
13. Mind Your Background
A cluttered or distracting background can take attention away from your subject. When framing your shot:
-
Look for clean, simple backgrounds.
-
Change angles or perspectives to eliminate visual noise.
-
Use depth (objects in foreground/midground/background) to add interest.
Sometimes moving just a few feet makes a huge difference in composition.
14. Try Different Perspectives
Don’t just shoot from eye level. Explore unique perspectives:
-
Get low to the ground for dramatic angles.
-
Shoot from above (flat lays or top-down views).
-
Capture reflections from puddles or mirrors.
-
Frame your subject using doorways, windows, or arches.
Changing your point of view can turn an ordinary shot into a captivating one.
15. Practice and Experiment
The more you shoot, the better you get. Don’t be afraid to:
-
Experiment with different lighting conditions.
-
Try abstract or minimalist styles.
-
Learn from other photographers on Instagram, Pinterest, or photo communities.
Set small challenges for yourself, like taking only black-and-white shots for a day or using only natural light.
Conclusion
Smartphone cameras have come a long way — but the camera is only half the story. By understanding basic photography principles and using the features your phone already offers, you can dramatically improve the quality of your photos.
With practice, patience, and a bit of creativity, you’ll find that your smartphone is more than capable of producing stunning, professional-looking images — whether you’re capturing everyday moments or creating visual art.